
Dollar for dollar, no new part takes a bike from dingy to dashing as noticeably as handlebar tape. But tape is about more than looks: a well-thought-out handlebar wrap takes into account the way your hands sit in the drops so that the tape lasts long and provides the cushion and slip-proof grip you need for long days in the saddle. “If your thumbs sit more toward the top of the bar, it means your hands roll more to the outside,” explains our resident bar-wrapping expert. “That means you want to wrap away from you.” (That’s clockwise on the right, counterclockwise on the left, so that the natural roll of your hands goes with the tape instead of pulling it loose.) “If your hands roll more to the inside, wrap toward you.” (Or, counterclockwise on the right, clockwise on the left.) Take a test spin with your hands on the base of the drops to figure out which direction is right for you. Then achieve the perfect handlebar wrap with these simple steps.
Start Fresh: Clamp your bike into a workstand, and roll back the brake-hood covers. Peel off your old bar tape, pop out the bar plugs, and scrape off leftover adhesive. Secure loose housing against the bar with electrical tape. Then scrub your grimy mitts before handling your new bar tape.
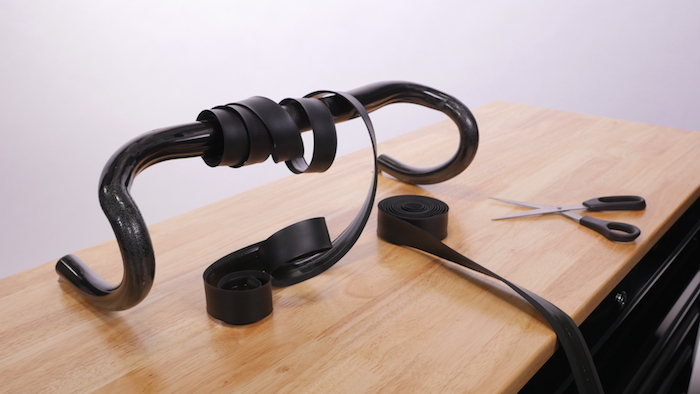
Wrap It Right and Tight: Partially peel off the new bar tape’s adhesive backing; peel more as you go. With the tape in your chosen direction (clockwise or counterclockwise), start at the end of the bar with the adhesive strip completely touching the edge of the bar, and the rest hanging off. Begin wrapping the handlebars, overlapping a third to half of the tape’s width as you go. Always keep tension on the tape as you wrap–enough to stretch it slightly but not so much that it tears. On bends, overlap more on the inside of the curve and less on the outside. If you notice gaps in the tape, unwrap and try again.
Halt for Brake Detail: Most new tape comes with two short pieces (if not, cut a 3-inch piece from each roll before you start wrapping). Use these to cover the brake-lever clamps. Regardless of your initial direction, always wrap the top, flat section of the bar with the tape going over the top of the bar, toward the rider; your hands will naturally work to tighten the tape as you ride. When wrapping to the outside, you need to change direction at the lever clamp. To do that, wrap as close as possible to the clamp, overlapping it by one-half to three-quarters the width of the tape. Then, wrap under the clamp at the front of the bar, up against the inside of the clamp, and over the top of the bar, overlapping the clamp slightly. Check for gaps in the tape here; if you spot any, re-wrap. Continue wrapping the top half of the bar. When wrapping to the inside, wrap as close to the bottom of the lever clamp as you can before continuing over the clamp.
Add Final Touches: The finish point is a preference thing. Note where you want your tape to end, wrap two or three turns beyond this spot, then mark the finish point in the tape with a scissors. Unwrap the tape, cut it at the marked angle, and re-wrap it so the cut end is at the bottom of the bar for a neat finish. Circle the end a couple times with electrical tape to secure it in place. Go back and tuck the overlap into the end of the bar and insert the end plug (tap it in place with a rubber mallet if you need to), and pull the brake hoods down. You’re done.
Difficulty (1 – 5): 2–it might take a few tries to get the tension and overlap just right
Tools: Workstand, new bar tape, electrical tape, scissors, rubber mallet
Time: Up to 30 minutes for first-timers; 15 minutes or less for experienced mechanics Cost in a shop: $12 to $15 for labor, plus $12 to $20 for tape.